From: http://technet.microsoft.com/en-us/library/cc262700.aspx
The procedures in this section are performed at the site collection level. To perform these procedures, you must be a site collection administrator for the site collection on which you want to perform them.
Create scopes at the site collection level
Site collection administrators can choose to use scopes that were created at the SSP level, copy scopes that were created at the SSP level and modify them, or create new site collection level scopes.
Use the following procedure, along with the decisions you recorded in the Site-collection level scopes section of the Plan the end-user search experience worksheet (http://go.microsoft.com/fwlink/?LinkId=74967&clcid=0x409), to copy shared scopes at the site collection level.
Copy shared scopes
1. On the top-level site of the site collection on which you want to create a scope, click Site actions, point to Site Settings, and then click Modify All Site Settings.
2. On the Site Settings page, in the Site Collection Administration section, click Search scopes.
3. On the View Scopes page, position the cursor over the name of the shared scope you want to copy, and then click Make Copy on the menu that appears.

Use the following procedure, along with the decisions you recorded in the Site-collection level scopes section of the Plan the end-user search experience worksheet (http://go.microsoft.com/fwlink/?LinkId=74967&clcid=0x409), to create scopes at the site collection level.
Create scopes at the site collection level
1. On the top-level site of the site collection on which you want to create a scope, click Site actions, point to Site Settings, and then click Modify All Site Settings.
2. On the Site Settings page, in the Site Collection Administration section, click Search scopes.
3. On the View Scopes page, click New Scope.
4. On the Create Scope page, in the Title and Description section, type a brief title for the scope that will best explain it to your users. You can also type a fuller description for reference by site administrators.
5. Ignore the Display Groups section for now. We will assign display groups to scopes later in this article.
6. In the Target Results Page section, select one of the following:
· Use the default Search Results Page. Select this option if you want search results from this scope to be presented by using the standard Search Results page.
· Specify a different page for searching this scope. Select this option if you want search results from this scope to be presented on a custom page. If you select this option, type the URL for the custom Search Results page in the Target results page box.
7. Click OK.
Create scope rules at the site collection level
Use the following procedure, along with the decisions you recorded in the Site-collection level scopes section of the Plan the end-user search experience worksheet (http://go.microsoft.com/fwlink/?LinkId=74967&clcid=0x409), to create scope rules.
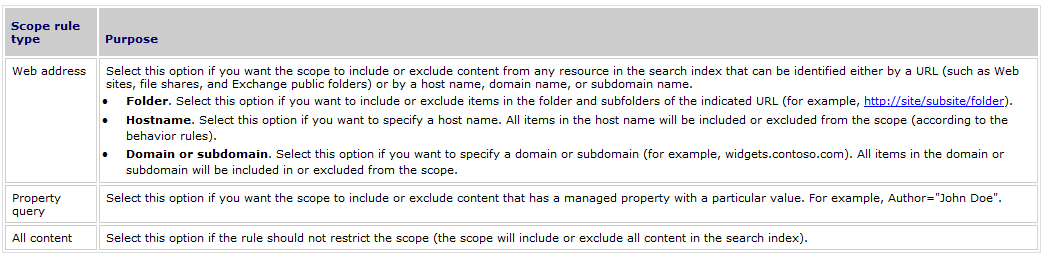
The following table describes the scope rule types that you can choose from when creating a site-collection level scope rule. For simplicity, a separate procedure is provided for each scope rule type.
Use the following procedure to open the Add Scope Rule page.
Open the Add Scope Rule page
1. On the top-level site of the site collection on which you want to create a scope rule, click Site actions, point to Site Settings, and then click Modify All Site Settings.
2. On the Site Settings page, in the Site Collection Administration section, click Search scopes.
3. On the View Scopes page, position the cursor over the scope that you want to edit, click the arrow that appears, and then click Edit Properties and Rules on the menu that appears.

4. On the Scope Properties and Rules page, in the Rules section, click New rule.
Use the following procedure to create scope rules by using the Web address scope rule type.
Create scope rules by using the Web address scope rule type
1. On the Add Scope Rule page, in the Scope Rule Type section, select Web Address.
2. In the Web Address section, select one of the following options and provide the address you want to associate with this rule:
· Folder. Select this option if you want to include or exclude items in the folder and subfolders of the indicated URL (for example, http://site/subsite/folder).
· Hostname. Select this option if you want to specify a host name. All items in the host name will be included or excluded from the scope (according to the behavior rules).
· Domain or subdomain. Select this option if you want to specify a domain or subdomain (for example, widgets.contoso.com). All items in the domain or subdomain will be included in or excluded from the scope.
3. In the Behavior section, select one of the following options:
· Include. Select this option if you want the rule to be applied (if another rule precludes its inclusion, it won't be included). The Include option is analogous to the logical operator AND.
· Require. Select this option if you want the rule to be applied regardless of other rules. The Require option is analogous to the logical operator OR.
· Exclude. Select this option if you want items that match this rule to be excluded from the scope. The Exclude option is analogous to the logical operator AND NOT.
4. Click OK.
Use the following procedure to create scope rules by using the Property Query scope rule type.
Create scope rules by using the Property Query scope rule type
1. On the Add Scope Rule page, in the Scope Rule Type section, select Property Query.
2. In the Property Query section, select the managed property that you want to use to limit the scope from the Add property restrictions list.
3. In the = box, type the string (value) that the managed property needs to match.
4. In the Behavior section, select one of the following options:
· Include. Select this option if you want the rule to be applied (if another rule precludes its inclusion, it won't be included). The Include option is analogous to the logical operator AND.
· Require. Select this option if you want the rule to be applied regardless of other rules. The Require option is analogous to the logical operator OR.
· Exclude. Select this option if you want items that match this rule to be excluded from the scope. The Exclude option is analogous to the logical operator AND NOT.
5. Click OK.
Use the following procedure to create scope rules by using the All content scope rule type.
Create scope rules by using the All content scope rule type
1. On the Add Scope Rule page, in the Scope Rule Type section, select All Content.
2. Click OK.
Manage display groups
To support a customized search experience, you can set up new display groups with which to associate your scopes, and you can assign scopes to the default display groups. Site administrators can also control the order in which scopes appear within a particular display group. After you create a display group, designers can modify the Search Box Web Part to display it.
Create a new display group
Use the following procedure, along with the decisions you recorded in the Display groups section of the Plan the end-user search experience worksheet (http://go.microsoft.com/fwlink/?LinkId=74967&clcid=0x409), to create display groups at the site collection level and to assign the scopes you want to them.
Create display groups
1. On the top-level site of the site collection on which you want to create a display group, click Site actions, point to Site Settings, and then click Modify All Site Settings.
2. On the Site Settings page, in the Site Collection Administration section, click Search scopes.
3. On the View Scopes page, click New Display Group.
4. On the Create Scope Display Group page, type a title and description that easily identifies the purpose of the group.
5. In the Scopes section, select the check box next to each scope that you want to include in this display group. You can manage the ordering of the scopes in the group by using the Position from Top lists.
6. In the Default Scope section, in the Default Scope list, select the scope that you want to be applied if users do not make a choice on their own.
7. Click OK.
Assign scopes to default display groups
Use the following procedure, along with the decisions you recorded in the Display groups section of the Plan the end-user search experience worksheet (http://go.microsoft.com/fwlink/?LinkId=74967&clcid=0x409), to assign scopes to the default Search Drop-down and Advanced Search display groups.
Assign scopes to default display groups
1. On the top-level site of the site collection on which you want to assign scopes, click Site actions, point to Site Settings, and then click Modify All Site Settings.
2. On the Site Settings page, in the Site Collection Administration section, click Search scopes.
3. On the View Scopes page, in the Title column, click Search Dropdown.
4. On the Edit Scope Display Group page, in the Scopes section, select the check boxes for the scopes you want to be included in this display group, and clear the check boxes for the scopes you want to remove from this display group.
5. Optionally use the Position from Top lists to specify the order in which the scopes will appear to the user for this display group.
6. Click OK.
7. On the View Scopes page, in the Title column, click Advanced Search.
8. On the Edit Scope Display Group page, in the Scopes section, select the check boxes for the scopes you want to be included in this display group, and clear the check boxes for the scopes you want to remove from this display group.
9. Optionally use the Position from Top lists to specify the order in which the scopes will appear to the user for this display group.
10. Click OK.
Modify the Search Box Web Part for a new display group
Use the following procedure to modify the Search Box Web Part for a new display group.
Modify the Search Box Web Part for a new display group
1. Go to the Search Center page on the site collection on which you want to modify the Search Box Web Part.
2. Click Site actions, and then click Edit Page.
3. In the search box, click Edit, and then click Modify Shared Web Part.
4. In the Search Box tool pane, click the plus sign (+) next to Miscellaneous.
5. In the Scope Display Group text box, type the name of the display group that you want to use, and then click Apply.
6. Click OK to close the tool pane.
7. On the Search Center page, click either Publish or Check In to Share Draft, depending on your site permissions and workflow.
Create keywords and Best Bets
Search keywords and Best Bets enable you to provide two important features to help your users get the search results they need:
· Search keywords enable you to create a glossary of important terms within your organization. When a user types the keyword in a search query, the definition that has been created for that keyword is displayed at the top of the Search Results page.
· Best Bets enable you to prominently present editorially selected search results. Best Bets are URLs to pages, documents, or external Web sites that you associate with particular search keywords. When a user types a keyword in a search query that has one or more Best Bets, the Search Results page prominently displays the Best Bet URLs, including the title and description of each one.
Best Bets are most helpful in situations in which a site administrator wants to promote specific pages. Because the Best Bet URLs are displayed prominently on the Search Results page, end users may be more inclined to view them.
Use the following procedure, along with the decisions you recorded in the Keywords and Best Bets section of the Plan the end-user search experience worksheet (http://go.microsoft.com/fwlink/?LinkId=74967&clcid=0x409), to create keywords and Best Bets.
Create keywords and Best Bets
1. On the top-level site of the site collection on which you want to create keywords and Best Bets, click Site actions, point to Site Settings, and then click Modify All Site Settings.
2. On the Site Settings page, in the Site Collection Administration section, click Search keywords.
3. On the Manage Keywords page, click Add Keyword.
4. On the Add Keyword page, in the Keyword Information section, in the Keyword Phrase box, type the keyword phrase you want to create.
5. In the Synonyms box, type the synonyms you want to associate with this keyword phrase. You can type more than one synonym by separating them with semicolons.
6. If you want to associate a Best Bet with this keyword, in the Best Bets section, click Add Best Bet. Otherwise, skip to step 13.
7. If this is the first Best Bet you will create on this site collection, skip to step 9. Otherwise, in the Add Best Bet dialog box, do one of the following:
· To create a new Best Bet, select Add new best bet and then skip to step 9.
· To select an existing Best Bet, select Select existing best bet, click the Best Bet you want from the Select best bets from the list below box, and then click OK. Skip to step 13.
8. In the URL box, type the URL you want to associate with this Best Bet.
9. In the Title box, type the title you want to associate with this Best Bet. This title appears in the Select best bets from the list below box, when selecting an existing Best Bet.
10. In the Description box, type a description for this Best Bet. This description appears with the Best Bet on the Search Results page.
11. Click OK.
12. If you want to create a definition for this keyword, in the Keyword Definition section, type the definition that you want to appear next to Best Bets for this keyword on the Search Results page (optional).
13. In the Contact section, type the user name of the person to inform when the keyword is past its review date (optional).
14. In the Publishing section, you can optionally choose end and review dates for this keyword.
15. Click OK.
16. Repeat steps 4 through 16 to create additional keywords and best bets.


No comments:
Post a Comment